JUnit5 and Parameterized Tests
Streamline Your Test Cases with the Magic of Parameterization

Introduction
JUnit is an essential framework in the Java world for unit testing. You might already be familiar with writing test cases, assertions, and handling expected exceptions in JUnit. However, there is a powerful feature that you might be missing: Parameterized Tests. In this article, we will delve into how you can use Parameterized Tests in JUnit 5 to make your test cases more concise and maintainable.
What are Parameterized Tests?
Parameterized tests are a feature that allows you to execute the same test case multiple times but with different input values. This can save you time and keep your codebase cleaner by reducing the number of explicitly written test cases. Instead of writing separate test methods for each set of input data, you can write a single test and provide multiple sets of inputs. This not only makes your test code more concise but also helps in easy maintenance as the code evolves.
Benefits
Code Reusability: Avoid redundancy in test cases by reusing the same test method with different data sets.
Scalability: Easily add more test cases by just adding new sets of data.
Readability: Improves readability by structuring the input data neatly.
Maintainability: Makes maintaining tests easier, especially when test logic is complex.
How It Works
In a parameterized test, you define the test method just once. However, instead of hardcoding the input values within the test method, you define them separately and annotate the test method to indicate that it should be run multiple times with different input values. JUnit 5 provides several annotations to define these input values.
Example
Let’s say you have a utility method for calculating the area of a rectangle and you want to test this method. Instead of writing multiple test cases, you can use a parameterized test.
import static org.junit.jupiter.api.Assertions.assertEquals;
import org.junit.jupiter.params.ParameterizedTest;
import org.junit.jupiter.params.provider.MethodSource;
import java.util.stream.Stream;
import org.junit.jupiter.params.provider.Arguments;

class AreaCalculatorTest {

    @ParameterizedTest
    @MethodSource("rectangleAreaProvider")
    void testRectangleArea(int length, int width, int expectedArea) {
        assertEquals(expectedArea, calculateRectangleArea(length, width));
    }

    private static Stream<Arguments> rectangleAreaProvider() {
        return Stream.of(
            Arguments.of(1, 2, 2),
            Arguments.of(3, 4, 12),
            Arguments.of(5, 6, 30)
        );
    }

    private int calculateRectangleArea(int length, int width) {
        return length * width;
    }
}
In this example, testRectangleArea is the test method that will be executed multiple times. The @ParameterizedTest annotation indicates that this is a parameterized test. The @MethodSource annotation points to the method rectangleAreaProvider, which provides different sets of input values. Each set of values (length, width, and expectedArea) is used as input to the testRectangleArea method in different executions.
Parameterized tests can be used for a wide range of scenarios, from simple input validation to complex algorithm testing. By utilizing them in your test suite, you can make your testing process more efficient and effective.
Setting Up JUnit 5
To harness the power of Parameterized Tests in JUnit 5, you first need to ensure that your project is set up to use JUnit 5. Here is a detailed guide for setting up JUnit 5 in your Java project.
Prerequisites
JDK 8 or later
A build tool such as Maven or Gradle (optional, but recommended)
Adding Dependencies with Maven
If you are using Maven as your build tool, add the following dependency to your pom.xml file. Note that JUnit 5 is part of the JUnit Jupiter project, and you should use the junit-jupiter artifact:
<dependency>
    <groupId>org.junit.jupiter</groupId>
    <artifactId>junit-jupiter</artifactId>
    <version>5.9.3</version>
    <scope>test</scope>
</dependency>
Adding Dependencies with Gradle
If you are using Gradle, add the following dependency to your build.gradle file:
dependencies {
    testImplementation 'org.junit.jupiter:junit-jupiter:5.9.3'
}
Configuring Maven Surefire Plugin
If you are using Maven, it's important to ensure that you're using a version of the Surefire plugin that supports JUnit 5. Add the following plugin configuration to your pom.xml file:
<build>
    <plugins>
        <plugin>
            <groupId>org.apache.maven.plugins</groupId>
            <artifactId>maven-surefire-plugin</artifactId>
            <version>3.1.2</version>
        </plugin>
    </plugins>
</build>
IDE Support
Modern IDEs like IntelliJ IDEA, Eclipse, and NetBeans have built-in support for JUnit 5. However, ensure that your IDE is up to date, as older versions may not support JUnit 5.
Writing a Basic JUnit 5 Test
Before diving into Parameterized Tests, let's write a basic JUnit 5 test to make sure everything is set up correctly. Create a class CalculatorTest with the following code:
import static org.junit.jupiter.api.Assertions.assertEquals;

import org.junit.jupiter.api.Test;
import org.junit.jupiter.params.ParameterizedTest;
import org.junit.jupiter.params.provider.CsvSource;

class CalculatorTest {

    private final Calculator calculator = new Calculator();

    @Test
    void testAddition() {
        Calculator calculator = new Calculator();
        assertEquals(5, calculator.add(2, 3));
    }

    private static class Calculator {
        int add(int a, int b) {
            return a + b;
        }
    }
}
This is a simple test class with a single test case to check the addition method of a Calculator class.
Running the Test
Run the test case through your IDE, or, if you are using Maven, run the following command in the terminal:
mvn test
If you're using Gradle, you can run:
./gradlew test
If everything is set up correctly, the test should execute successfully.
Now that your project is set up to use JUnit 5, you are ready to dive into writing Parameterized Tests as covered in the subsequent sections of this article.
Writing Your First Parameterized Test
Now that you have JUnit 5 set up, let’s dive deeper into writing your first parameterized test. For this example, let's consider you have a simple utility class that provides functionality to calculate the sum of two numbers.
Step 1: Write the parameterized test
Create a new test class named CalculatorTest. Use the @ParameterizedTest annotation to indicate that this is a parameterized test. For this example, let's use the @CsvSource annotation to provide comma-separated values. Each line in @CsvSource represents a set of input parameters followed by the expected output.
import static org.junit.jupiter.api.Assertions.assertEquals;
import org.junit.jupiter.api.Test;
import org.junit.jupiter.params.ParameterizedTest;
import org.junit.jupiter.params.provider.CsvSource;
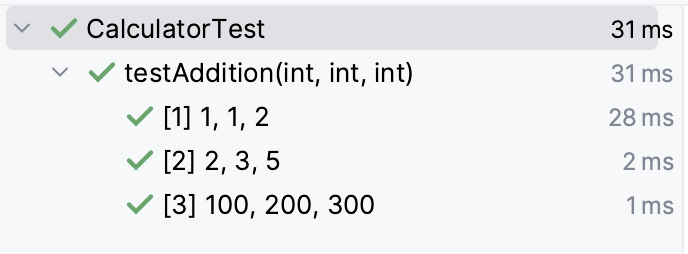
class CalculatorTest {
private final Calculator calculator = new Calculator();
@Test
void testAddition() {
Calculator calculator = new Calculator();
assertEquals(5, calculator.add(2, 3));
}
@ParameterizedTest
@CsvSource({
"1, 1, 2",
"2, 3, 5",
"100, 200, 300"
})
void testAddition(int a, int b, int expectedResult) {
assertEquals(expectedResult, calculator.add(a, b));
}
private static class Calculator {
int add(int a, int b) {
return a + b;
}
}
}
In the above example, the testAddition method is annotated with @ParameterizedTest to signify it's a parameterized test. The @CsvSource annotation provides three sets of data. Each set contains two input numbers and the expected sum. The testAddition method is executed three times with different sets of data.
Step 3: Run the Test
You can run this test in the same way you run regular JUnit tests. If you're using an IDE, you can usually right-click the test class and select 'Run'. If you're using Maven or Gradle, it will also recognize and run your parameterized test as part of the test phase.
Step 4: Understand the Output
When the test runs, JUnit will execute the testAddition method multiple times with different parameters. If the output matches the expected result, the test passes. If any of the executions fail (meaning the output didn't match the expected result), then the parameterized test fails.
Step 5: Analyze and Refactor
After running the tests, if you encounter any failures, it’s essential to analyze the test and the code under test. Determine whether the failure is due to incorrect input data or an issue with the implementation. If needed, update the implementation or correct the test data and re-run the tests.
Parameterized tests are an invaluable tool for increasing coverage with various inputs without the need to write a new test case for each input scenario. This keeps your test suite concise and maintainable. As you get more comfortable with parameterized tests, you can explore more advanced features like custom argument sources and converters.
Formatting the Display Name of Parameterized Tests
In JUnit 5, you can customize the display name of parameterized tests to include the parameters used in each invocation. This is particularly useful for better understanding which values are being tested, especially when looking at test reports. To achieve this, you use the name attribute of the @ParameterizedTest annotation.
The name attribute allows you to specify a pattern for the display name. You can use {index} as a placeholder for the current test invocation index (1-based), and {arguments} to include a list of the actual parameter values. Additionally, you can reference individual method parameter values using {0}, {1}, etc., based on their position.
Here's an example that demonstrates how to format the display name using the name attribute:
import static org.junit.jupiter.api.Assertions.assertEquals;
import org.junit.jupiter.params.ParameterizedTest;
import org.junit.jupiter.params.provider.CsvSource;
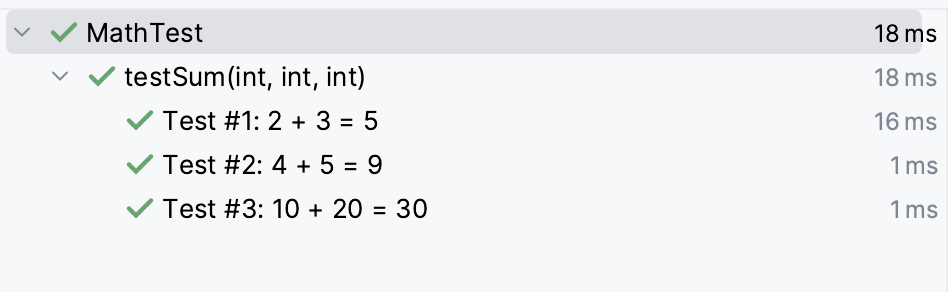
class MathTest {
@ParameterizedTest(name = "Test #{index}: {0} + {1} = {2}")
@CsvSource({"2, 3, 5", "4, 5, 9", "10, 20, 30"})
void testSum(int a, int b, int expectedSum) {
assertEquals(expectedSum, a + b);
}
}
In this example, the display name of each test invocation will be something like "Test #1: 2 + 3 = 5", "Test #2: 4 + 5 = 9", and so on. This makes it easier to understand what values are being used in each test case just by looking at the display name.
Different Sources of Parameters
JUnit 5 offers a variety of sources for parameters that can be used in parameterized tests. In this section, we will look at each type of source and provide examples for each of them.
1. ValueSource
@ValueSource allows you to specify a single set of literal values (e.g., integers, strings) that will be used as arguments for the parameterized test.
Example:
import static org.junit.jupiter.api.Assertions.assertTrue;
import org.junit.jupiter.params.ParameterizedTest;
import org.junit.jupiter.params.provider.ValueSource;

class NumberTest {

    @ParameterizedTest
    @ValueSource(ints = {2, 4, 8, 16, 32})
    void testNumberIsPowerOfTwo(int number) {
        assertTrue(isPowerOfTwo(number));
    }

    private boolean isPowerOfTwo(int number) {
        return (number & (number - 1)) == 0;
    }
}
2. EnumSource
@EnumSource allows you to use enum constants as the source of parameters. Additionally, it provides an attribute named mode that lets you control how the enum constants are used in the test. The EnumSource.Mode enum includes several options such as INCLUDE, EXCLUDE, MATCH_ALL, and MATCH_ANY.
Example Enum Class:
import static org.junit.jupiter.api.Assertions.assertNotNull;
import org.junit.jupiter.params.ParameterizedTest;
import org.junit.jupiter.params.provider.EnumSource;
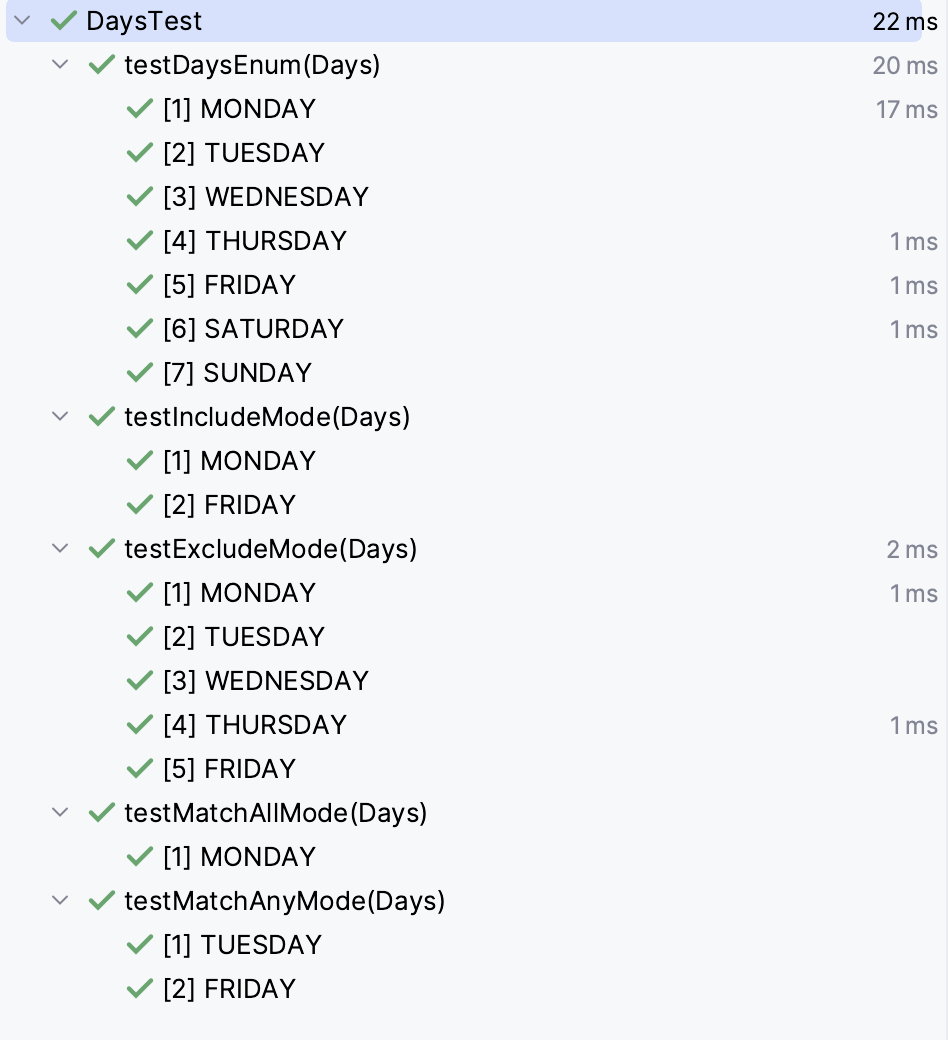
class DaysTest {
enum Days {
MONDAY,
TUESDAY,
WEDNESDAY,
THURSDAY,
FRIDAY,
SATURDAY,
SUNDAY
}
@ParameterizedTest
@EnumSource(Days.class)
void testDaysEnum(Days days) {
assertNotNull(days);
}
}
Example with INCLUDE Mode:
javaCopy codeimport static org.junit.jupiter.api.Assertions.assertNotNull;
import org.junit.jupiter.params.ParameterizedTest;
import org.junit.jupiter.params.provider.EnumSource;

class DaysTest {

    @ParameterizedTest
    @EnumSource(value = Days.class, mode = EnumSource.Mode.INCLUDE, names = {"MONDAY", "FRIDAY"})
    void testIncludeMode(Days day) {
        assertNotNull(day);
    }
}
Example with EXCLUDE Mode:
javaCopy codeimport static org.junit.jupiter.api.Assertions.assertNotNull;
import org.junit.jupiter.params.ParameterizedTest;
import org.junit.jupiter.params.provider.EnumSource;

class DaysTest {

    @ParameterizedTest
    @EnumSource(value = Days.class, mode = EnumSource.Mode.EXCLUDE, names = {"SATURDAY", "SUNDAY"})
    void testExcludeMode(Days day) {
        assertNotNull(day);
    }
}
Example with MATCH_ALL Mode:
javaCopy codeimport static org.junit.jupiter.api.Assertions.assertNotNull;
import org.junit.jupiter.params.ParameterizedTest;
import org.junit.jupiter.params.provider.EnumSource;

class DaysTest {

    @ParameterizedTest
    @EnumSource(value = Days.class, mode = EnumSource.Mode.MATCH_ALL, names = {"^.*DAY$", "^MON.*"})
    void testMatchAllMode(Days day) {
        assertNotNull(day);
    }
}
Example with MATCH_ANY Mode:
javaCopy codeimport static org.junit.jupiter.api.Assertions.assertNotNull;
import org.junit.jupiter.params.ParameterizedTest;
import org.junit.jupiter.params.provider.EnumSource;

class DaysTest {

    @ParameterizedTest
    @EnumSource(value = Days.class, mode = EnumSource.Mode.MATCH_ANY, names = {"^TUES.*", "^FRI.*"})
    void testMatchAnyMode(Days day) {
        assertNotNull(day);
    }
}
3. CsvSource
As we saw earlier, @CsvSource allows you to define sets of values as comma-separated strings. Each string represents the parameters for one invocation of the parameterized test.
Example:
import static org.junit.jupiter.api.Assertions.assertEquals;
import org.junit.jupiter.params.ParameterizedTest;
import org.junit.jupiter.params.provider.CsvSource;

class MathTest {

    @ParameterizedTest
    @CsvSource({"2, 3, 5", "4, 5, 9", "10, 20, 30"})
    void testSum(int a, int b, int expectedSum) {
        assertEquals(expectedSum, a + b);
    }
}
The @CsvSource annotation in JUnit 5 allows you to provide comma-separated values (CSV) as the source of parameters for a parameterized test. In addition to just specifying the values, @CsvSource offers a few more attributes that give you greater control over how the values are interpreted and passed to the test method. These attributes are:
value: This is where you provide the sets of values as an array of strings. Each string represents the parameters for one invocation of the parameterized test. The values within each string are comma-separated by default.delimiter: Allows you to specify a custom delimiter character that separates values within each string. The default delimiter is a comma (,).delimiterString: Similar todelimiter, but allows you to specify a delimiter as a string (it can be more than one character).emptyValue: Allows you to specify a custom string that represents an empty value (defaults to"").nullValues: Allows you to specify one or more strings that should be interpreted asnull.textBlock: Allows attribute allows you to specify the CSV values as a text block, which is ideal for multiline content.
Let's look at examples that demonstrate the use of these attributes.
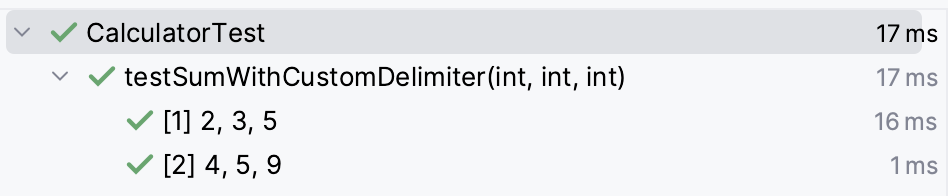
Using a Custom Delimiter
@ParameterizedTest
@CsvSource(value = {"2 : 3 : 5", "4 : 5 : 9"}, delimiter = ':')
void testSumWithCustomDelimiter(int a, int b, int expectedSum) {
    assertEquals(expectedSum, a + b);
}
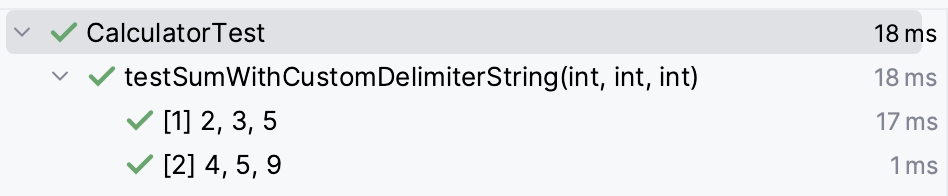
Using a Custom Delimiter String
@ParameterizedTest
@CsvSource(value = {"2 || 3 || 5", "4 || 5 || 9"}, delimiterString = "||")
void testSumWithCustomDelimiterString(int a, int b, int expectedSum) {
    assertEquals(expectedSum, a + b);
}
Representing Empty Values
@ParameterizedTest
@CsvSource(value = {"'', Smith"}, emptyValue = "Unknown")
void testName(String firstName, String lastName) {
    Assertions.assertEquals("Unknown", firstName);
}

Representing Null Values
@ParameterizedTest
@CsvSource(value = {"NULL, Smith"}, nullValues = "NULL")
void testNameWithNulls(String firstName, String lastName) {
    Assertions.assertNull(firstName);
}

Using textBlock Attribute
The textBlock attribute allows you to specify the CSV values as a text block, which is ideal for multiline content. This greatly enhances readability, especially when dealing with several sets of parameters. Text blocks in Java are delimited by triple double-quotes """, and they preserve the line breaks and spacing within the block.
Here's an example using the textBlock attribute:
javaCopy codeimport static org.junit.jupiter.api.Assertions.assertEquals;
import org.junit.jupiter.params.ParameterizedTest;
import org.junit.jupiter.params.provider.CsvSource;

class MathTest {

    @ParameterizedTest
    @CsvSource(textBlock = """
        2, 3, 5
        4, 5, 9
        10, 20, 30
    """)
    void testSumTextBlock(int a, int b, int expectedSum) {
        assertEquals(expectedSum, a + b);
    }
}

Using useHeadersInDisplayName with textBlock
JUnit 5.8 also introduced the useHeadersInDisplayName attribute, which, when set to true, uses the headers specified in the CSV content as placeholders in the display name of the parameterized test.
Here is an example that combines textBlock and useHeadersInDisplayName:
javaCopy codeimport static org.junit.jupiter.api.Assertions.assertEquals;
import org.junit.jupiter.params.ParameterizedTest;
import org.junit.jupiter.params.provider.CsvSource;
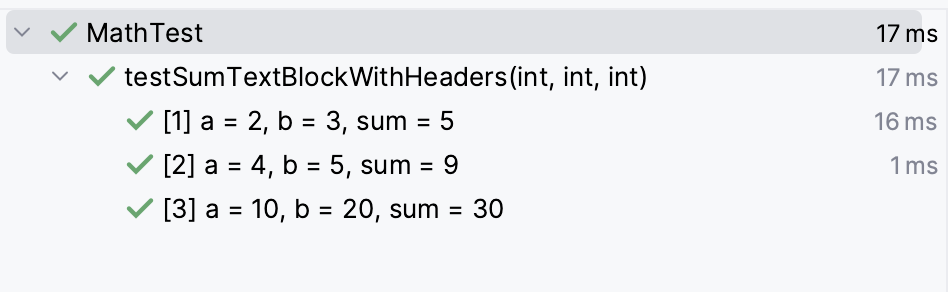
class MathTest {
@ParameterizedTest
@CsvSource(textBlock = """
a, b, sum
2, 3, 5
4, 5, 9
10, 20, 30
""", useHeadersInDisplayName = true)
void testSumTextBlockWithHeaders(int a, int b, int expectedSum) {
assertEquals(expectedSum, a + b);
}
}
In this example, the first line of the text block contains headers (a, b, sum), and the useHeadersInDisplayName attribute is set to true. This means that the display name of the test will use these headers as placeholders for the values.
Using these attributes, you can customize how the parameters are parsed and passed to your test methods with @CsvSource. This gives you the flexibility to accommodate different data formats and testing scenarios.
4. MethodSource
@MethodSource allows you to refer to methods in the test class that provide the parameters. The method must return a Stream, Iterable, Iterator, or array of arguments.
Example:
import java.util.stream.Stream;
import static org.junit.jupiter.api.Assertions.assertTrue;
import org.junit.jupiter.params.ParameterizedTest;
import org.junit.jupiter.params.provider.MethodSource;
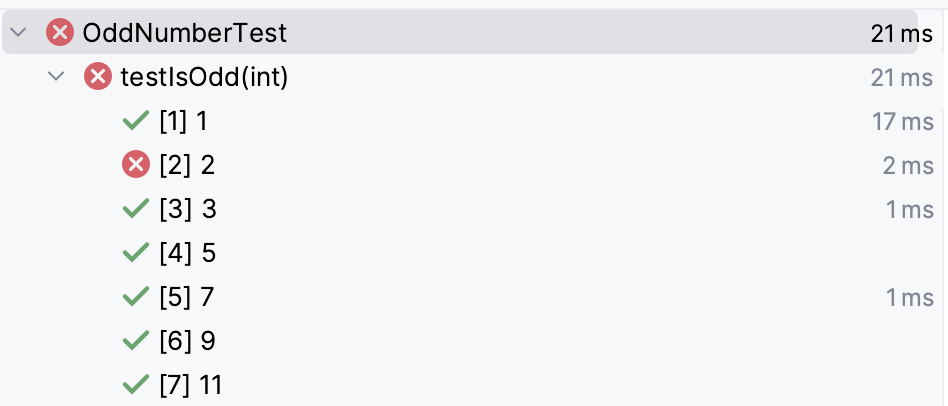
class OddNumberTest {
@ParameterizedTest
@MethodSource("provideOdds")
void testIsOdd(int number) {
assertTrue(isOdd(number));
}
private static Stream<Integer> provideOdds() {
return Stream.of(1, 2, 3, 5, 7, 9, 11);
}
private boolean isOdd(int number) {
return number % 2 != 0;
}
}
5. ArgumentsSource
@ArgumentsSource allows you to create reusable and more complex parameter sources by defining a custom class that generates the arguments. This is especially useful when working with complex objects and scenarios.
To use @ArgumentsSource, you must create a class that implements the ArgumentsProvider interface. This interface mandates implementing the provideArguments method, which should return a Stream<? extends Arguments>.
Let's take an example where we have a Person class, and we want to test whether the full name of the person is being correctly constructed.
First, let's define the Person class:
Person.java
public static class Person {
    private final String firstName;
    private final String lastName;

    public Person(String firstName, String lastName) {
        this.firstName = firstName;
        this.lastName = lastName;
    }

    public String getFullName() {
        return firstName + " " + lastName;
    }

    @Override
    public String toString() {
        return "Person{" +
                "firstName='" + firstName + '\'' +
                ", lastName='" + lastName + '\'' +
                '}';
    }
}
Now, let's create an ArgumentsProvider that provides different instances of the Person class along with their expected full names:
import java.util.stream.Stream;
import org.junit.jupiter.api.extension.ExtensionContext;
import org.junit.jupiter.params.provider.Arguments;
import org.junit.jupiter.params.provider.ArgumentsProvider;
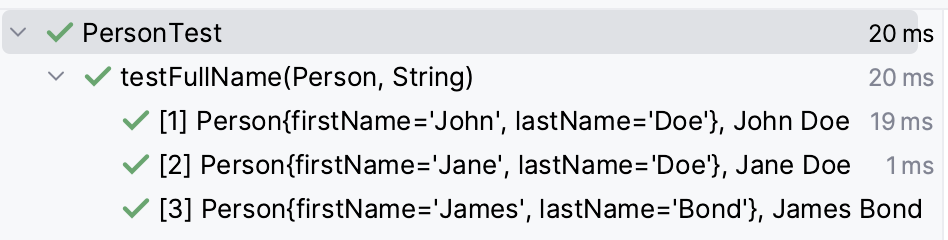
public static class PersonArgumentsProvider implements ArgumentsProvider {
@Override
public Stream<? extends Arguments> provideArguments(ExtensionContext extensionContext) {
return Stream.of(
Arguments.of(new Person("John", "Doe"), "John Doe"),
Arguments.of(new Person("Jane", "Doe"), "Jane Doe"),
Arguments.of(new Person("James", "Bond"), "James Bond")
);
}
}
Finally, let's write a parameterized test that uses the @ArgumentsSource annotation and specifies the PersonArgumentsProvider as the source of arguments:
javaCopy codeimport static org.junit.jupiter.api.Assertions.assertEquals;
import org.junit.jupiter.params.ParameterizedTest;
import org.junit.jupiter.params.provider.ArgumentsSource;

public class PersonTest {

    @ParameterizedTest
    @ArgumentsSource(PersonArgumentsProvider.class)
    public void testFullName(Person person, String expectedFullName) {
        assertEquals(expectedFullName, person.getFullName());
    }
}
In this example, the PersonArgumentsProvider class implements ArgumentsProvider and supplies a stream of arguments where each argument consists of a Person object and the expected full name. The testFullName method in the PersonTest class is annotated with @ArgumentsSource and uses PersonArgumentsProvider as the source of arguments. This approach allows for very flexible and reusable parameter sources for your tests.
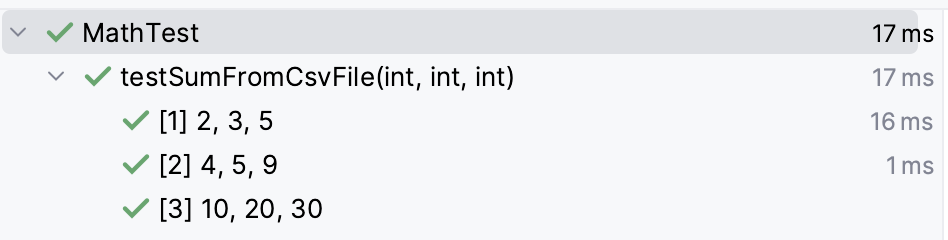
6. CsvFileSource
@CsvFileSource allows you to read parameters from a CSV file. This is useful when you have a large set of parameters.
Example:
First, create a file named input.csv in the src/test/resources folder with the following content:
2,3,5
4,5,9
10,20,30
Now, write the test class:
import static org.junit.jupiter.api.Assertions.assertEquals;
import org.junit.jupiter.params.ParameterizedTest;
import org.junit.jupiter.params.provider.CsvFileSource;

class MathTest {

    @ParameterizedTest
    @CsvFileSource(resources = "/input.csv")
    void testSumFromCsvFile(int a, int b, int expectedSum) {
        assertEquals(expectedSum, a + b);
    }
}
Each of these sources for parameters has its use cases, and by using them effectively, you can make your test suite more powerful and maintainable. Choose the one that best fits the requirement of your parameterized test.
Conclusion
Parameterized testing is a powerful feature in JUnit 5 that allows you to execute the same test multiple times with different sets of input values. Throughout this article, we delved into the essentials of parameterized tests and explored the various sources of parameters including @ValueSource, @EnumSource, @CsvSource, @MethodSource, and @ArgumentsSource. We also took a closer look at some advanced features like formatting display names, using text blocks for multiline CSV data, and creating custom argument providers with complex objects.
Embracing parameterized tests can significantly improve the quality of your test suite by ensuring that your code is validated against a wide range of input. It also helps in keeping your test cases DRY (Don't Repeat Yourself) and enhances readability.
As you continue to write tests for your Java applications, consider employing parameterized tests for scenarios where you need to validate the behavior of a method or functionality against various input combinations. This will not only bolster the robustness of your tests but also provide a more comprehensive assessment of your code's reliability.
For further reading and to dive deeper into other features, you can visit the official JUnit 5 documentation.
As a final note, the complete code examples discussed in this article are available on GitHub. Feel free to clone the repository, experiment with the examples, and create your parameterized tests. You can also contribute by suggesting improvements or sharing your examples.
Contributions and feedback are always welcome! This repository is intended to be a collaborative space for sharing knowledge and best practices for JUnit 5 and parameterized testing.
Remember that good tests are just as crucial as good code. By leveraging the capabilities of JUnit 5’s parameterized tests, you’re taking a significant stride in producing quality software.
Happy testing! 🚀